
MindConnect-NodeJS - Agent Development - Getting Started
The easiest way to start is to use the provided command line interface to create a starter project:
# for typescript nodejs project run
npx @mindconnect/mindconnect-nodejs starter-ts

# for javascript nodejs project run
npx @mindconnect/mindconnect-nodejs starter-js

# if you have CLI installed

# for typescript project
mdsp starter-ts

# for javascript project
mdsp starter-js
TypeScript vs JavaScript
All examples are in typescript. They can be converted to javascript by removing the types.
// example in typescript
const i: number = 0;

// example in javascript
const i = 0;
async/await vs Promises
The examples use the async/await syntax for the promises (available in typescript and in javascript from EcmaScript8)
try {
    await agent.OnBoard();
    console.log("agent was successfully onboarded");
} catch (err) {
    console.log(err);
}
But you can also write code like this using the classical promise syntax:
agent.OnBoard()
    .then (function() {
        console.log("agent was successfully onboarded";
    )}
    ).error(function(err){
        console.log(err)
    });
How to create a NodeJs Insights Hub agent
The following steps describe the easiest way to test the library. You can of course create the required dependencies also programmatically via API calls.
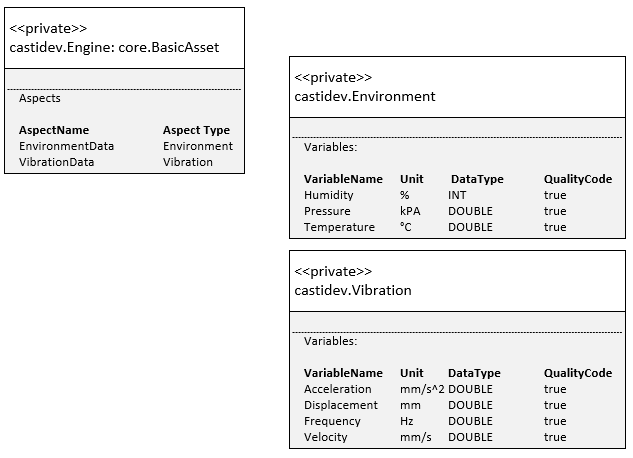
Step 0: Create an asset type and aspect types
MindSphere V3 IoT model requires that you create an asset type and aspect types to describe your assets. For the example we will create an asset type of type Engine with two aspect types: Environment and Vibration. (Note that my tenant is called castidev, you will have to use your own tenant name)
More information about Insights Hub Data Model.
Step 1: Create an asset
Create an asset (In example it is called AcmeMotor) of type Engine in AssetManager for your data.
Step 2: Create an agent of type MindConnectLib in Insights Hub
Create an agent in Asset Manager of type MindConnectLib (core.mclib) create initial JSON token and store it to file (e.g. agentconfig.json)
{
    "content": {
        "baseUrl": "https://southgate.eu1.mindsphere.io",
        "iat": "<yourtokenishere>",
        "clientCredentialProfile": ["SHARED_SECRET"],
        "clientId": "a3ac5ae889544717b02fa8282a30d1b4",
        "tenant": "<yourtenantishere>"
    },
    "expiration": "2018-04-06T00:47:39.000Z"
}
More Information about MindConnectLib configuration.
Step 3 : Create an agent
Read the initial configuration from the config file and create the agent. If you are using the SHARED_SECRET profile there is no need to setup the local certificate for the communication (recommended for smaller devices).
const configuration = require("../../agentconfig.json");
const agent = new MindConnectAgent(configuration);
If you want to use the RSA_3072 profile you must also set up the agent certificate.
// you can create the private.key for example using openssl:
// openssl genrsa -out private.key 3072

agent.SetupAgentCertificate(fs.readFileSync("private.key"));
Step 4: Onboard the agent
The first operation is onboarding of the agent. This creates a client secret which is used for the communication with Insights Hub.
This data is stored by default in the .mc folder in your application if you don't change the base path in the constructor of the agent.
Important: Make sure that your folder with the configurations is not reachable from the internet as it contains the client_secret for the authentication.
if (!agent.IsOnBoarded()) {
    await agent.OnBoard();
}
Step 5: Configure the data model and data mappings to asset variables. (via code)
Important: From the version 3.8.0 it is possible to create the data source configuration and data mappings fully automatic via code
First you need to create a data source configuration
// create data source configuration for an asset type castidev.Engine
const generatedConfig = await agent.GenerateDataSourceConfiguration(`${agent.GetTenant()}.Engine`);
await agent.PutDataSourceConfiguration(generatedConfig);
and then the data mappings:
const mappings = await agent.GenerateMappings(targetAssetId);
await agent.PutDataMappings(mappings);
Step 5a: Create automatic mapping to target asset
If you are just creating 1:1 asset to agent mappings the two steps above can be shortened into:
/// instead of creating the data source configuration and mappings separately
// you can also just use the method below which takes care of everything
// this is only used for 1:1 asset -> agent mappings
// the method above can also map the data source configuration to multiple assets
// just call GenerateMappings with different asset ids

await agent.ConfigureAgentForAssetId(targetAssetId);
SDK access: The agents have now access to Industrial IoT TypeScript SDK
agent.Sdk();
// the sdk gives you access to e.g. asset management client with which you can get asset types or assets from Insights Hub
// which can be used for automatic data source configuration and automatic mappings

const assetMgmt = agent.Sdk().GetAssetManagementClient();
await assetMgmt.GetAssets(...);
await assetMgmt.GetAspectTypes(...);
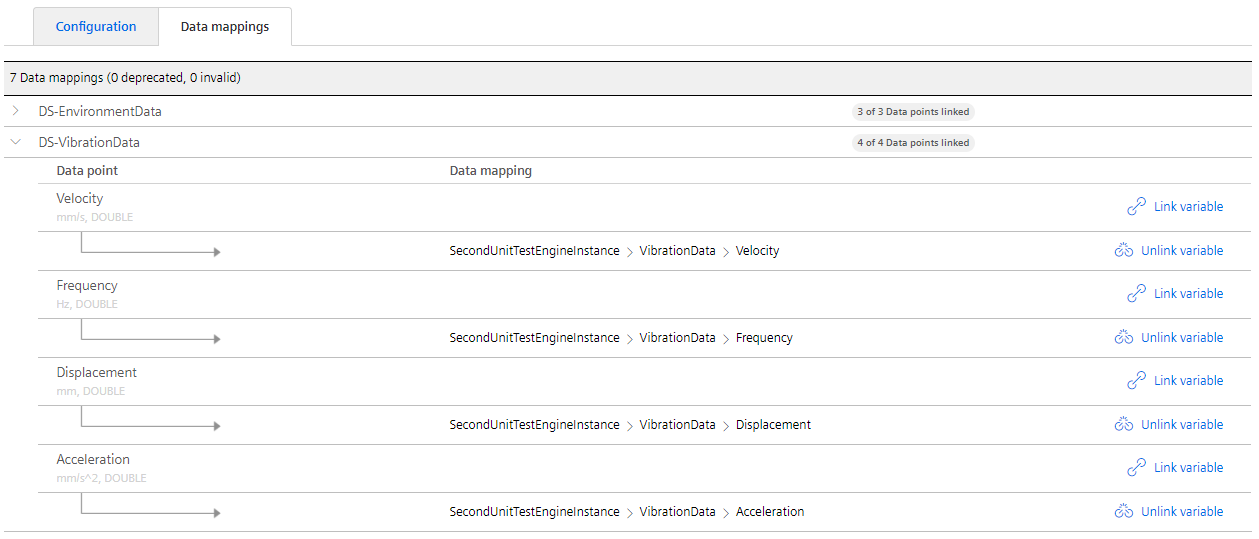
If you take a look at the Insights Hub configuration of your agent now it should look like this:

And the data mappings should be in place
Step 6 After this you can send the data in the code
for (let index = 0; index < 5; index++) {
    const values: DataPointValue[] = [
        {
            dataPointId: "DP-Temperature",
            qualityCode: "0",
            value: (Math.sin(index) * (20 + (index % 2)) + 25).toString(),
        },
        {
            dataPointId: "DP-Pressure",
            qualityCode: "0",
            value: (Math.cos(index) * (20 + (index % 25)) + 25).toString(),
        },
        { dataPointId: "DP-Humidity", qualityCode: "0", value: ((index + 30) % 100).toString() },
        { dataPointId: "DP-Acceleration", qualityCode: "0", value: (1000.0 + index).toString() },
        { dataPointId: "DP-Frequency", qualityCode: "0", value: (60.0 + index * 0.1).toString() },
        { dataPointId: "DP-Displacement", qualityCode: "0", value: (index % 10).toString() },
        { dataPointId: "DP-Velocity", qualityCode: "0", value: (50.0 + index).toString() },
    ];

    // there is an optional timestamp parameter if you need to use something else instead of Date.now()
    const result = await agent.PostData(values);
}
(If you were using UI to configure data mappings you will have long integers instead of human-readable data point Ids.)
Step 6.1 using bulk upload
If you don't want to send the data points one by one, you can also use the BulkPostData method
const bulk: TimeStampedDataPoint[] = [
    {
        timestamp: "2018-08-23T18:38:02.135Z",
        values: [
            { dataPointId: "DP-Temperature", qualityCode: "0", value: "10" },
            { dataPointId: "DP-Pressure", qualityCode: "0", value: "10" },
        ],
    },
    {
        timestamp: "2018-08-23T19:38:02.135Z",
        values: [
            { dataPointId: "DP-Temperature", qualityCode: "0", value: "10" },
            { dataPointId: "DP-Pressure", qualityCode: "0", value: "10" },
        ],
    },
];

await agent.BulkPostData(bulk);
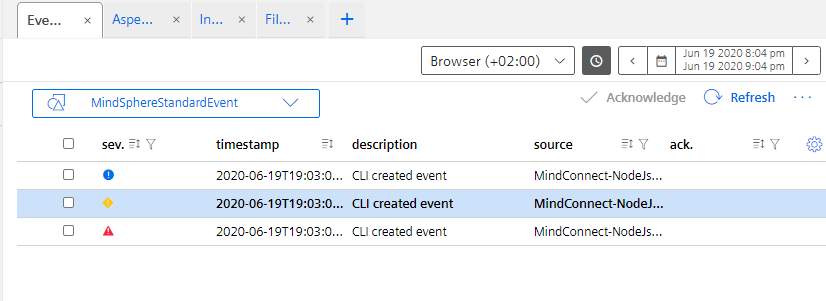
Events
Events can now be created with the library. You can create events for your agent or for your entities. In order to create an event for your entity you need to know the assetId of the asset.
const configuration = require("../../agentconfig.json");
const agent = new MindConnectAgent(configuration);

if (!agent.IsOnBoarded()) {
    await agent.OnBoard();
}

const event: Insights HubStandardEvent = {
    entityId: configuration.content.clientId, // use assetid if you dont want to store event in the agent :)
    sourceType: "Event",
    sourceId: "application",
    source: "Meowz",
    severity: 20, // 0-99 : 20:error, 30:warning, 40: information
    timestamp: new Date().toISOString(),
    description: "Test",
};

// send event with current timestamp
await agent.PostEvent(event);
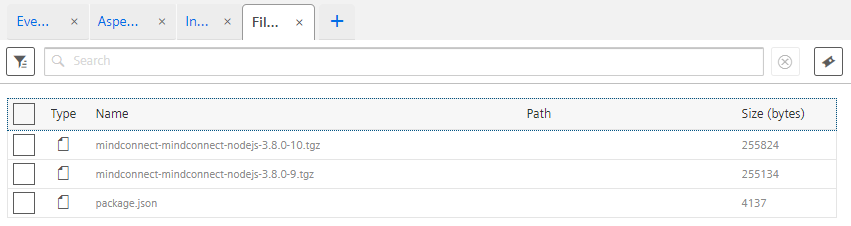
File Upload
Files can now be uploaded via the library. You can upload files for your agent or for your entities. In order to create an event for your entity you need to know the assetId of the asset.
Since version 3.5.1. the agents are using the multipart upload API of the Insights Hub. This means that the agents can upload files also bigger > 8 MB, The multipart upload must be switched on (chunk:true) if you want to activate this behavior. The parameter parallelUploads determine the maximal number of parallel uploads. You can increase this on a powerful computer to speed up the upload or decrease to prevent network congestion.
const configuration = require("../../agentconfig.json");
const agent = new MindConnectAgent(configuration);

if (!agent.IsOnBoarded()) {
    await agent.OnBoard();
}

await agent.UploadFile(agent.ClientId(), "custom/mindsphere/path/package.json", "package.json", {
    retry: RETRYTIMES,
    description: "File uploaded with MindConnect-NodeJS Library",
    parallelUploads: 5,
    chunk: true,
});
Full Agent
Here is a demo agent implementation.
You can observe the data in the Insights Hub.
Community
Connect and Collaborate with Industrial Professionals and Join the Community!